Tutorial: An Easier and Better Way to Create a Sketch
If you’ve ever tried to get Photoshop to create a convincing black and white sketch (line art), you’ve no doubt found that the “Sketch” filters don’t really cut it. The method I’ll show you today is one I found recently somewhere on the Intertubes, and I’ve added a coloring method. The secret is a filter I’ve never used before: Minimum.

The glowing edges filter can be used to get a line drawing of sorts. I see the Glowing Edges filter used in a lot of tutorials. As you can see above, the results aren’t very satisfactory. So let’s take a look at how to use the Minimum filter to get a nice, clean line drawing or sketch. Thanks to stock artist Tracie76Stock on deviantArt for supplying the lovely photo used in this tutorial.

This method is far from intuitive, but it’s very easy and very fast. I really don’t know how it works, to be honest. As you can see above, the method involves copying your original color photo (drag it onto the Create a New Layer icon at the bottom of the layers palette); desaturate this copy; do this twice (you want two copies that are desaturated. Invert the second copy (Image>Adjustments>Invert), change the blend mode to Color Dodge, and then run the Mimimum filter, using a low value of 2 or 3 pixels. (See Layers screenshot at the end of this article if I’ve totally confused you.) When you first change the blending mode to Color Dodge, the image seems to nearly disappear. I’m just warning you, in case that takes you by surprise. It’s okay for that to happen. If you follow this method in the order I describe, when you get to running the Minimum filter, you’ll be able to see the sketch being created as you adjust the sliders. For a heavier drawing, use a higher value on the pixel slider. And basically, that’s it! It’s easy, and the results are, I think, really great. A sketch like this can be used as line art on its own, or you can use it as the starting point for a painting. By copying the original color layer once again, moving it to the top of the layer stack, and changing the blending mode to Color, you can get a nice delicate coloring, like this:

You can use the Rough Pastels filter on a copy of the original to add a nice sketchy color layer. You can use it with or without the Color layer above. I’ve used it with the Color layer. Copy the original image layer again, and move it to the top of the stack. Run the Rough Pastels filter with these settings: Stroke Length 5, Stroke Detail 4, Texture – Sandstone, Scaling 91%, Relief 30%. It looks too rough, but that’s good. Hit OK. Now change the blending mode for this layer to Multiply, and reduce the Opacity to taste. I found 40% worked well. The result is a darn good imitation of a line drawing that’s had some chalk or pastel work applied to it. The sandstone texture adds a nice realistic pastel paper effect.

For your reference, here are the layers for this project. If you found this tutorial helpful, please let me know by adding a comment. Thanks!

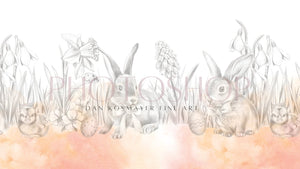
Here is the final result of the Sketch Technique.